


Tuesday, July 31, 2018
Thursday, February 16, 2017
Mail Server Zimbra 8.6 bisa kirim dan terima email dari luar
Setelah dipusingkan oleh Zimbra mail server yang bisa menerima
email dari luar tapi tidak bisa kirim email keluar (contoh : gmail)
ternyata kuncinya ada di “Relay MTA for external delivery” yang
kebetulan Mail Server yang saya seting disini menggunakan Astinet alias
Telkom.
masuk ke server mail zimbra : https://rsudkarawang.com
pada menu Configure :

kemudian pilih Global Setting

Lalu pilih MTA

Pada “Relay MTA for External Delivery” dengan : smtp.telkom.net port : 587 dan Uncheck pada “Enable DNS Lookup”

Coba lagi kirim email dari zimbra ke google, seharusnya berhasil.
Solusi Zimbra tidak bisa kirim dan terima email dari GMAIL dan Yahoo
Suatu ketika email server zimbra tidak bisa menjalankan service nya. dari log yang ada seperti dibawah ini
Sep 14 01:34:33 ns1 zimbramon[10544]: 10544:info: 2010-09-14 01:34:01, STATUS: : Unable: to determine enabled services. Cache is out of date or doesn't exist.
Sep 14 01:34:48 ns1 zimbramon[5130]: 5130:info: zmmtaconfig: Skipping Global system configuration update.
Sep 14 01:34:48 ns1 zimbramon[5130]: 5130:info: zmmtaconfig: gacf ERROR: service.FAILURE (system failure: ZimbraLdapContext) (cause: javax.naming.CommunicationException zimbra.erlangga.net:389)
Dugaan sementara, ldap service tidak bisa start karena zimbra server tidak bisa start service yang di bound ke ip address dari host mail server.
Dilakukan pengecekan hostname dari mesin dengan perintah hosts zimbra.erlangga.net, ternyata masih bound ke ip address luar yaitu 123.231.241.10 sementara posisi email server berada di ip address private di 10.1.1.10.
Kemudian dilakukan perubahan hostname di file /etc/hosts
Dilakukan pengecekan hostname dari mesin dengan perintah hosts zimbra.erlangga.net, ternyata masih bound ke ip address luar yaitu 123.231.241.10 sementara posisi email server berada di ip address private di 10.1.1.10.
Kemudian dilakukan perubahan hostname di file /etc/hosts
root@zimbra:/home/erik# more /etc/hosts
127.0.0.1         localhost
#123.231.241.10   zimbra.erlangga.net zimbra ubuntu ns1
10.1.1.10         zimbra.erlangga.net zimbra ubuntu ns1
Setelah dilakukan perubahan di file /etc/hosts kemudian dicoba dijalankan lagi service zimbra, dengan user zimbra.
zimbra@ns1:~/bin$zmcontrol start
zimbra@ns1:~/bin$zmcontrol status
Host zimbra.erlangga.net
        antispam                Running
        antivirus               Running
        ldap                    Running
        logger                  Running
        mailbox                 Running
        mta                     Running
        snmp                    Running
        spell                   Running
        stats                   Running
Zimbra berhasil start service email dengan baik. Kemudian di coba untuk mengirim email dari interface user web, dapat mengirim email dengan sukses.
Permasalahan nya, email server tidak bisa menerima email dari domain selain lokal domain, misal dari yahoo email tidak bisa mengirim email ke user@erlangga.net.
Setelah googling untuk permasalah tersebut menurut salah satu post di zimbra forum, dapat diatasi dengan menonaktifkan option enable DNS lookup di zimbra adminstration console.
 |
| Uncheck option enable DNS lookup |
Setelah dilakukan uncheck option enable DNS lookup, email server dapat menerima email dari luar (yahoo, gmail dll), tetapi masalah nya email dari lokal domain tidak bisa mengirim ke email diluar lokal domain.
Kesimpulan nya adalah option Enable DNS lookup tetap harus di check (enabled) tetapi resolve host dari server email untuk zimbra tetap harus menghasilkan 10.1.1.10 meskipun option Enable DNS lookup di check.
Karena server email zimbra terdapat server untuk dns juga, sehingga dibuat split DNS yang terdapat dua record dns yang akan menjawab tergantung dari ip mana yang query dns ke DNS server. Misal, jika client 10.0.0.0/8 menanyakan zimbra.erlangga.net maka DNS server akan menjawab zimbra.erlangga.net adalah 10.1.1.10, sementara jika yang menanyakan dari ip address publik misal dari 202.3.208.10 maka DNS server akan menjawab zimbra.erlangga.net adalah ip address 123.231.241.10.
Split DNS sudah dikonfigurasi dari awal setup server zimbra, tetapi ip address localhost 127.0.0.1 tidak dimasukan kedalam kelompok ip address lokal net, sehingga jika query dari 127.0.0.1 menanyakan zimbra.erlangga.net masih dijawab 123.231.241.10.
Dilakukan edit di file /etc/bind/named.conf seperti dibawah:
view "internal" {
        match-clients {
                192.168.0.0/16;
                10.0.0.0/8;
                127.0.0.1;
        };
        recursion yes;
Setelah dilakukan perubahan terhadap file named.conf kemudian lakukan restart DNS service dengan command:
root@zimbra:/home/erik#rndc reload
Sekarang DNS server akan menjawab zimbra.erlangga.net adalah 10.1.1.10 jika di query dari localhost, karena 127.0.0.1 telah masuk kedalam group internal.
Option Enable DNS lookup pada zimbra administration console dapat di enable kembali supaya mail server dapat mengirim email ke external domain.
Saat ini zimbra sudah dapat berjalan dengan normal kembali, mengirim dan menerima email ke external domain (yahoo,
TERIMA KASIH ATAS KUNJUNGANNYA
Sunday, February 12, 2017
These are ports typically available to mail clients.
External Access
These are ports typically available to mail clients.| Port | Protocol | Zimbra Service | Description |
|---|---|---|---|
| 25 | smtp | mta | incoming mail to postfix |
| 80 | http | mailbox / proxy | web mail client (disabled by default in 8.0) |
| 110 | pop3 | mailbox / proxy | POP3 |
| 143 | imap | mailbox / proxy | IMAP |
| 443 | https | mailbox / proxy - web mail client | HTTP over TLS |
| 465 | smtps | mta | Incoming mail to postfix over TLS (Legacy Outlook only? If possible, use 587 instead) |
| 587 | smtp | mta | Mail submission over TLS |
| 993 | imaps | mailbox / proxy | IMAP over TLS |
| 995 | pop3s | mailbox / proxy | POP3 over TLS |
| 3443 | https | proxy | User Certificate Connection Port (optional) |
| 9071 | https | proxy admin console | HTTP over TLS (optional) |
Internal Access
These are ports typically only used by the Zimbra system itself.| Port | Protocol | Zimbra Service | Description |
|---|---|---|---|
| 389 | ldap | ldap | LC(ldap_bind_url) |
| 636 | ldaps | ldaps | if enabled via LC(ldap_bind_url) |
| 3310 | - | mta/clamd | zimbraClamAVBindAddress |
| 7025 | lmtp | mailbox | local mail delivery; zimbraLmtpBindAddress |
| 7026 | milter | mailbox | zimbra-milter; zimbraMilterBindAddress |
| 7047 | http | conversion server | Accessed by localhost by default; binds to '*' |
| 7071 | https | mailbox | admin console HTTP over TLS; zimbraAdminBindAddress |
| 7072 | http | mailbox | ZCS nginx lookup - backend http service for nginx lookup/authentication |
| 7073 | http | mailbox | ZCS saslauthd lookup - backend http service for SASL lookup/authentication (added in ZCS 8.7) |
| 7110 | pop3 | mailbox | Backend POP3 (if proxy configured); zimbraPop3BindAddress |
| 7143 | imap | mailbox | Backend IMAP (if proxy configured); zimbraImapBindAddress |
| 7171 | - | zmconfigd | configuration daemon; localhost |
| 7306 | mysql | mailbox | LC(mysql_bind_address); localhost |
| 7307 | mysql | logger | logger (removed in ZCS 7) |
| 7780 | http | mailbox | spell check |
| 7993 | imaps | mailbox | Backend IMAP over TLS (if proxy configured); zimbraImapSSLBindAddress |
| 7995 | pop3s | mailbox | Backend POP3 over TLS (if proxy configured); zimbraPop3SSLBindAddress |
| 8080 | http | mailbox | Backend HTTP (if proxy configured on same host); zimbraMailBindAddress |
| 8443 | https | mailbox | Backend HTTPS (if proxy configured on same host); zimbraMailSSLBindAddress |
| 8465 | milter | mta/opendkim | OpenDKIM milter service; localhost |
| 10024 | smtp | mta/amavisd | to amavis from postfix; localhost |
| 10025 | smtp | mta/master | opendkim; localhost |
| 10026 | smtp | mta/amavisd | "ORIGINATING" policy; localhost |
| 10027 | smtp | mta/master | postjournal |
| 10028 | smtp | mta/master | content_filter=scan via opendkim; localhost |
| 10029 | smtp | mta/master | "postfix/archive"; localhost |
| 10030 | smtp | mta/master | 10032; localhost |
| 10031 | milter | mta/cbpolicyd | cluebringer policyd |
| 10032 | smtp | mta/amavisd | (antispam) "ORIGINATING_POST" policy |
| 10663 | - | logger | LC(logger_zmrrdfetch_port); localhost |
| 23232 | - | mta/amavisd | amavis-services / msg-forwarder (zeromq); localhost |
| 23233 | - | mta/amavisd | snmp-responder; localhost |
| 11211 | memcached | memcached | nginx route lookups, mbox cache (calendar, folders, sync, tags); zimbraMemcachedBindAddress |
System Access and Intra-Node Communication
In a multi-node environment the typical communication between nodes required includes:Please note: this table is a WORK IN PROGRESS
| Destination | Source(s) | Description | ||||||
|---|---|---|---|---|---|---|---|---|
| ALL | ||||||||
| 22 | *ALL* | SSH (system & zmrcd): host management | ||||||
| udp/53 | *ALL* | DNS (system ¦ dnscache): name resolution | ||||||
| Logger | ||||||||
| udp/514 | *ALL* | syslog: system and application logging | ||||||
| LDAP | ||||||||
| 389 | *ALL* | all nodes talk to LDAP server(s) | ||||||
| MTA | ||||||||
| 25 | ldap | sent email (cron jobs) | ||||||
| 25 | mbox | sent email (web client, cron, etc.) | ||||||
| antivirus | ||||||||
| 3310 | mbox | zimbraAttachmentsScanURL (not set by default) | ||||||
| memcached | ||||||||
| 11211 | mbox | mbox metadata data cache | ||||||
| 11211 | proxy | backend mailbox route cache | ||||||
| Mailbox (mbox) | ||||||||
| 80 | proxy | backend proxy http | ||||||
| 110 | proxy | backend proxy pop3 | ||||||
| 143 | proxy | backend proxy imap | ||||||
| 443 | proxy | backend proxy https | ||||||
| 993 | proxy | backend proxy imaps | ||||||
| 995 | proxy | backend proxy pop3s | ||||||
| 7025 | mta | all mta talk to any mbox (LMTP) | ||||||
| 7047 | mbox | localhost by default; zimbraConvertdURL | ||||||
| 7071 | mbox | all mbox talk to any mbox (Admin) | ||||||
| 7072 | proxy | zmlookup; zimbraReverseProxyLookupTarget | ||||||
| 7073 | mta | sasl auth; zimbraMtaAuthTarget (since ZCS 8.7) | ||||||
Melihat berapa memori terpakai di Linux
Untuk memastikan performa server walaupun itu virtual atau dedicated
maka besar RAM adalah salah satu faktor terpenting. Dari pengalaman
kalau sudah banyak pengunjung situsnya maka selain penggunaan prosesor
meningkat juga memori terpakai bisa membengkak drastis. Sudah wajar
kalau kita ingin melacak letak permasalahannya dan apakah membutuhkan
upgrade ke paket yang lebih besar (dan mahal tentunya).
Untuk mengetahui berapa besar RAM yang digunakan oleh server Linux anda maka cukup dengan mengetikkan perintah:
Kalau tidak ingin repot – repot mengkonversi maka jalankan saja perintah
Untuk mengetahui berapa besar RAM yang digunakan oleh server Linux anda maka cukup dengan mengetikkan perintah:
free total used free shared buffers cached
Mem: 524288 131140 393148 2948 0 59708
-/+ buffers/cache: 71432 452856
Swap: 65536 26220 39316 Kalau tidak ingin repot – repot mengkonversi maka jalankan saja perintah
free tadi dengan parameter -m:free -m total used free shared buffers cached
Mem: 512 128 383 2 0 58
-/+ buffers/cache: 69 442
Swap: 64 25 38- total: Adalah berapa besar memori server anda seluruhnya.
- used: Berapa banyak RAM yang sedang digunakan.
- free: Besar memori yang bebas tidak sedang dipakai.
- Swap: Memori tambahan yang bersifat virtual, diletakkan dalam harddisk.
TERIMA KASIH ATAS KUNJUNGANNYA
Tuesday, February 7, 2017
Install dan konfigurasi Server LPSE di Centos
Install dan konfigurasi Server LPSE di Centos
Berikut langkah – langkah untuk instalasi dan konfigurasi SPSE v36sp3 dan v40 di centos- Diasumsikan server sudah terinstall OS Centos ( saya menggunakan centos 6.5 x86_64)
- Aplikasi yang dibutuhkan SPSE adalah httpd (Apache), Postgresql (minimal versi 8), Postfix (sebagai pelempar email), JDK8(jdk1.8.0 versi source code), modsecurity2, modevasive, Aplikasi web SPSE versi terbaru (3.6sp3 dan 4.0) yang didapat dari LKPP.
- Asumsi IP Address server 192.168.1.5
- Semua pekerjaan menggunakan CLI
- Gunakan selalu user root untuk konfigurasi, ditandai dg “ # “
- Instalasi ini digunakan untuk server latihan, maka ada beberapa bagian yg tidak saya postingkan detail misalnya dalam pembuatan database saya tinggal import dari database dari LKPP
# nano /etc/sysconfig/network-scripts/ifcfg-eth0

Lalu restart service networknya
# /etc/init.d/network restart
atau menggunakan
# service network restart
atau menggunakan
# service network restart
Lakukan update yum
# yum update
Install service Apache
# yum install httpd httpd-devel
Install service postgresql
# yum install postgresql-server
Install file2 pendukung lainnya
# yum install pcre* libxml2* libcurl* lua* libtool make wget
Start semua service
# service httpd start
# chkconfig httpd on
# service postgresql initdb
# service postgresql start
# chkconfig postgresql on
Persiapkan folder utk source, SPSE dan File Upload
# mkdir -p /home/source
# mkdir -p /home/appserv
# mkdir -p /home/file
# mkdir -p /home/file/file_latihan
Masukkan semua source yang didapat dari LKPP ke dalam folder
/home/source menggunakan aplikasi remote winscp diantaranya jdk1.8.0,
play-1.3.3, jce_policy-8.zip dan hasil pg_dump dari database server
latihan lkpp (misal epns-latihan.backup) serta aplikasi web spse( epns-lat-36sp3 dan spse-lat-40).
Copykan file jdk1.8.0 dan play-1.3.3 ke folder /usr/local/src
# cp -R /home/source/jdk1.8.0 /usr/local/src/
# cp -R /home/source/play-1.3.3 /usr/local/src/
# cd /home/source
# unzip jce_policy-8.zip
# cp -vr /home/source/UnlimitedJCEPolicyJDK8/* /usr/local/src/jdk1.8.0/jre/lib/security/
# cd /home/source
# unzip jce_policy-8.zip
# cp -vr /home/source/UnlimitedJCEPolicyJDK8/* /usr/local/src/jdk1.8.0/jre/lib/security/
# chmod 755 -R /usr/local/src/*
Copykan epns-lat-36sp3 dan spse-lat-40 ke /home/appserv
# cp -R /home/source/epns-lat-36sp3 /home/appserv/
# cp -R /home/source/spse-lat-40 /home/appserv/
Import database hasil dari pg_dump yang ada di folder source
# su postgres
$ createdb -U postgres -O epns epns-latihan
$ pg_restore -U postgres -Fc -vd epns-latihan /home/source/epns-latihan.backup
$ exit
# cp -R /home/source/spse-lat-40 /home/appserv/
Import database hasil dari pg_dump yang ada di folder source
# su postgres
$ createdb -U postgres -O epns epns-latihan
$ pg_restore -U postgres -Fc -vd epns-latihan /home/source/epns-latihan.backup
$ exit
Install modsecurity dan modevasive nya
# cd /usr/src
# nano /var/lib/pgsql/data/pg_hba.conf ==> (ubah methode ident menjadi trust)
# wget http://www.modsecurity.org/download/modsecurity-apache_2.6.8.tar.gz
# tar xzf modsecurity-apache_2.6.8.tar.gz
# cd modsecurity-apache_2.6.8
# ./configure
# make && make install
# cp modsecurity.conf-recommended /etc/httpd/conf.d/modsecurity.conf
# cd /usr/src
# wget http://www.zdziarski.com/blog/wp-content/uploads/2010/02/mod_evasive_1.10.1.tar.gz
# tar xzf mod_evasive_1.10.1.tar.gz
# cd mod_evasive
# apxs -cia mod_evasive20.c
Tambahkan konfigurasi pendukung utk spse kedalam httpd.conf.
# nano /etc/httpd/conf/httpd.conf
# nano /etc/httpd/conf/httpd.conf
Alias /latihan /home/appserv/epns-lat-36sp3
Alias /file_latihan /home/file/file_latihan
<DirectoryMatch /home/appserv/epns-lat-36sp3/webapp/WEB-INF>
AllowOverride None
Order deny,allow
deny from all
</DirectoryMatch>
AllowOverride None
Order deny,allow
deny from all
</DirectoryMatch>
ProxyRequests Off
ProxyVia Off
ProxyPreserveHost On
ProxyTimeout 6000
ProxyVia Off
ProxyPreserveHost On
ProxyTimeout 6000
ProxyPass /latihan http://localhost:8009/latihan
ProxyPassReverse /latihan http://localhost:8009/latihan
ProxyPassReverse /latihan http://localhost:8009/latihan
ProxyPass /eproc4lat http://localhost:9009/eproc4lat
ProxyPassReverse /eproc4lat http://localhost:9009/eproc4lat
ProxyPassReverse /eproc4lat http://localhost:9009/eproc4lat
SetOutputFilter DEFLATE
DeflateBufferSize 65536
DeflateCompressionLevel 9
DeflateFilterNote Input instream
DeflateFilterNote Output outstream
DeflateFilterNote Ratio ratio
DeflateMemLevel 9
DeflateWindowSize 15
BrowserMatch ^Mozilla/4\.0[678] no-gzip
BrowserMatch “Windows 98” gzip-only-text/html
BrowserMatch “MSIE [45]” gzip-only-text/html
BrowserMatch \bMSI[E] !no-gzip !gzip-only-text/html
SetEnvIfNoCase Request_URI \.(?:gif|jpeg|jpe|jpg|png|ico|t?gz|zip|rar|pdf|doc|xls|dat)$ no-gzip dont-vary
LogFormat ‘”%r” %{outstream}n/%{instream}n (%{ratio}n%%)’ deflate
CustomLog /var/log/httpd/deflate_log deflate
<IfModule mod_headers.c>
Header append Vary User-Agent env=!dont-vary
</IfModule>
Header append Vary User-Agent env=!dont-vary
</IfModule>
<VirtualHost *:80>
LogLevel warn
CustomLog /var/log/httpd/access.log combined
RedirectMatch ^/$ /eproc4lat
RedirectMatch ^/latihan$ /latihan/
AddOutputFilterByType DEFLATE text/html text/plain text/xml text/css application/x-javascript application/x-httpd-php
SetInputFilter DEFLATE
SetOutputFilter DEFLATE
</VirtualHost>
<IfModule mod_evasive20.c>
DOSHashTableSize 6194
DOSPageCount 25
DOSSiteCount 80
DOSPageInterval 1
DOSSiteInterval 1
DOSBlockingPeriod 10
</IfModule>
DOSHashTableSize 6194
DOSPageCount 25
DOSSiteCount 80
DOSPageInterval 1
DOSSiteInterval 1
DOSBlockingPeriod 10
</IfModule>
SecAuditEngine RelevantOnly
SecRequestBodyAccess On
SecResponseBodyAccess On
SecAuditLogParts ABCFHZ
SecAuditLog /var/log/httpd/audit_apache.log
SecDebugLog /var/log/httpd/modsec_debug.log
SecDebugLogLevel 3
SecDefaultAction log,auditlog,deny,status:403,phase:2,t:none
SecRuleEngine On
SecServerSignature “Netscape-Enterprise/6.0 PHP5.2.0 mod_asp/3.4.5”
SecRule ARGS “\.\./”
SecRule ARGS “<[[:space:]]*script”
#SecRule ARGS “<(.|\n)+>”
SecRule REQUEST_BODY “(document\.cookie|Set-Cookie|SessionID=)”
SecRule REQUEST_BODY “<[^>]*meta*\”?[^>]*>”
SecRule REQUEST_BODY “<[^>]*style*\”?[^>]*>”
SecRule REQUEST_BODY “<[^>]*script*\”?[^>]*>”
SecRule REQUEST_BODY “<[^>]*iframe*\”?[^>]*>”
SecRule REQUEST_BODY “<[^>]*object*\”?[^>]*>”
SecRule REQUEST_BODY “<[^>]*img*\”?[^>]*>”
SecRule REQUEST_BODY “<[^>]*applet*\”?[^>]*>”
SecRule REQUEST_BODY “<[^>]*form*\”?[^>]*>”
SecRule REQUEST_HEADERS:User-Agent “Nikto” “log,deny,status:403,msg:’Nikto Scanners Identified’”
SecRule HTTP_HOST “\x25”
SecRule HTTP_HOST “^$” “log,allow,msg:’no http host’”
SecRule HTTP_USER_AGENT “^$” “log,allow,msg:’No user agent’”
SecRule REQUEST_BODY “/^(etc|bin|sbin|tmp|var|opt|dev|kernel|exe)$/”
SecRule ARGS “delete[[:space:]]+from”
SecRule ARGS “insert[[:space:]]+into”
SecRule ARGS “select.+from”
SecRule ARGS “\<\!–\#”
#SecRule ARGS “((=))[^\n]*(<)[^\n]+(>)”
SecRule REQUEST_BODY “(\’|\”)”
#SecRule REQUEST_BODY “!^[\x20-\x7f]+$”
SecRule REQUEST_URI “^/(bin|cgi|cgi(\.cgi|-91[45]|-sys|-local|s|-win|-exe|-home|-perl)|(mp|web)cgi|(ht|ows-)bin|scripts|fcgi-bin)/”
SecRule REQUEST_BODY “/bin/ps”
SecRule ARGS “wget\x20”
SecRule ARGS “uname\x20-a”
SecRule REQUEST_BODY “/nessus_is_probing_you_”
SecRule REQUEST_URI “^OR 1=1–*”
SecRequestBodyLimit 800000000
SecResponseBodyLimit 800000000
SecResponseBodyLimit 800000000
<LocationMatch /cgi-bin/>
SecRule REQUEST_URI “!(script1\.cgi|script2\.cgi|custom_email\.pl|form\.cgi\.exe)”
</LocationMatch>
SecRule REQUEST_URI “!(script1\.cgi|script2\.cgi|custom_email\.pl|form\.cgi\.exe)”
</LocationMatch>
#SecRule RESPONSE_STATUS “@streq 408” “phase:5,t:none,nolog,pass,setvar:ip.slow_dos_counter=+1,expirevar:ip.slow_dos_counter=60”
#SecRule IP:SLOW_DOS_COUNTER “@gt 25” “phase:1,t:none,log,drop,msg:’Client Connection Dropped due to high # of slow DoS alerts’”
#SecRule IP:SLOW_DOS_COUNTER “@gt 25” “phase:1,t:none,log,drop,msg:’Client Connection Dropped due to high # of slow DoS alerts’”
TYPE DATABASE USER CIDR-ADDRESS METHOD# “local” is for Unix domain socket connections only
local all all trust
# IPv4 local connections:
host all all 127.0.0.1/32 trust
# IPv6 local connections:
host all all ::1/128 trust
local all all trust
# IPv4 local connections:
host all all 127.0.0.1/32 trust
# IPv6 local connections:
host all all ::1/128 trust
(sesuaikan nama databasenya)
jdbc.url=jdbc:postgresql://localhost:5432/epns-latihan
# nano /home/appserv/epns-lat-36sp3/spse3
#JAVA_HOME : sesuaikan lokasi Java (jdk1.8.0)
JAVA_HOME=/usr/local/src/jdk1.8.0
#APP_HOME : sesuaikan lokasi folder SPSE 36sp3
APP_HOME=/home/appserv/epns-lat-36sp3
#Sesuaikan port proxy yg telah di konfigurasi pada httpd.conf
PORT=8009
#Sesuaikan dengan nama alias yg telah di konfigurasi pada httpd.conf
CONTEXT=/latihan
# nano /home/appserv/epns-lat-36sp3/update.shJAVA_HOME=/usr/local/src/jdk1.8.0
#APP_HOME : sesuaikan lokasi folder SPSE 36sp3
APP_HOME=/home/appserv/epns-lat-36sp3
#Sesuaikan port proxy yg telah di konfigurasi pada httpd.conf
PORT=8009
#Sesuaikan dengan nama alias yg telah di konfigurasi pada httpd.conf
CONTEXT=/latihan
#APP_HOME : sesuaikan lokasi aplikasi SPSE 36sp3
APP_HOME=/home/appserv/epns-lat-36sp3
#setting JAVA_HOME dan PLAY_HOME
#JAVA_HOME : sesuaikan lokasi Java (jdk1.8.0)
if [ ! ${JAVA_HOME} ]; then
JAVA_HOME=/usr/local/src/jdk1.8.0
APP_HOME=/home/appserv/epns-lat-36sp3
#setting JAVA_HOME dan PLAY_HOME
#JAVA_HOME : sesuaikan lokasi Java (jdk1.8.0)
if [ ! ${JAVA_HOME} ]; then
JAVA_HOME=/usr/local/src/jdk1.8.0
# cd /home/appserv/epns-lat-36sp3/
# chmod +x spse3
# chmod +x update.sh
# service httpd restart
# service postgresql restart
# ./update.sh (tetap dlm folder /home/appserv/epns-lat-36sp3. utk mengetahui kita berada di folder mana, ketik pwd)
# ./spse3 start ( setelah muncul notifikasi spse sedang jalan, tekan control + c (ctrl + c) untuk meneruskan konfig spse v40)
Setelah itu, cek apakah spse v36 sudah running melalui browser client. Apabila telah running, kita lanjutkan dengan konfigurasi spse v40. cari dan sesuaikan seperti yg tertera di bawah ini..
# cd /home/appserv/spse-lat-40
# nano conf/application.conf
http.path=/eproc4lat
http.port=9009
db.url=jdbc:postgresql://localhost:5432/epns-latihan
sirup.url=http://sirup.lkpp.go.id/sirup-lat
sikap.url=http://latihan-lpse.lkpp.go.id/sikap
spse3.url=http://192.168.1.5/latihan (sesuaikan dg ip / host domain tempat spse v36 latihan digunakan)
http.port=9009
db.url=jdbc:postgresql://localhost:5432/epns-latihan
sirup.url=http://sirup.lkpp.go.id/sirup-lat
sikap.url=http://latihan-lpse.lkpp.go.id/sikap
spse3.url=http://192.168.1.5/latihan (sesuaikan dg ip / host domain tempat spse v36 latihan digunakan)
#JAVA_HOME : sesuaikan lokasi Java (jdk1.8.0)
JAVA_HOME=/usr/local/src/jdk1.8.0
#APP_HOME : sesuaikan dengan lokasi folder aplikasi SPSE v40
APP_HOME=/home/appserv/spse-lat-40
#Play Home : sesuaikan dengan lokasi folder Play
PLAY_HOME=/usr/local/src/play-1.3.3
#Play Version
PLAY_VERSION=play-1.3.3
#sesuaikan dengan port proxy untuk spse v40 latihan pada konfigurasi httpd.conf
PORT=9009
# chmod +x spse4
# ./spse4 start
Apabila tidak ada kendala atau error pada aplikasi spse4 diatas, silahkan dicoba melalui browser client
Jika ada kendala / error, bisa di cek errornya pada file log
# tail -f /home/appserv/epns-lat-36sp3/logs/system.out ==> (untuk spse v36)
# tail -f /home/appserv/spse-lat-40/logs/system.out ==> (untuk spse 40)
Dari file tersebut bisa di ketahui berjalan atau tidaknya aplikasi spse kita. Apabila aplikasi sudah berjalan normal, step terakhir kita masukkan service spse ke dalam file rc.local
# nano /etc/rc.local
/home/appserv/spse-lat-40/spse4 stop
/home/appserv/epns-lat-36sp3/spse3 stop
/home/appserv/epns-lat-36sp3/spse3 stop
/home/appserv/spse-lat-40/spse4 start
/home/appserv/epns-lat-36sp3/spse3 start
touch /var/lock/subsys/local
/home/appserv/epns-lat-36sp3/spse3 start
touch /var/lock/subsys/local
# chmod +x /etc/rc.d/rc.local
Alhamdulillah, instalasi dan konfigurasi telah selesai. Selanjutnya saya beri sedikit tips & trik untuk OS Centos, karena default dari os ini, security berada pada kondisi menutup semua port. Ini bisa dilakukan pada awal sebelum install dan konfigurasi spse, namun saya letakkan pada bagian bawah karena diharapkan teman2 lebih mengetahui terlebih dahulu security2 pada setiap OS sebelum melakukan peng instalan ataupun konfigurasi. Sangat disarankan, jangan mendisable iptables (firewall) namun sesuaikan…
Disabled selinux dengan cara
# nano /etc/sysconfig/selinux
SELINUX=disabled
# yum -y install dbus dbus-python system-config-firewall-tui
# service messagebus start
# system-config-firewall-tui
akan muncul seperti ini


lalu close dan ok. lakukan penyesuaian firewall dengan menggunakan fasilitas tsb untuk memudahkan kita.
Selesai sudah perjumpaan kita untuk Install dan Konfigurasi SPSE pada OS Centos, mudah mudahan bermanfaat untuk kita semua.
sumber : http://infolpse.pasuruankab.go.id/home/?p=23
TERIMA KASIH ATAS KUNJUNGANNYA
Monday, January 23, 2017
How to open a port in the firewall on CentOS or RHEL
Question: I am running a web/file server on
my CentOS box, and to access the server remotely, I need to modify a
firewall to allow access to a TCP port on the box. What is a proper way
to open a TCP/UDP port in the firewall of CentOS/RHEL?
Out of the box, enterprise Linux distributions such as CentOS or RHEL
come with a powerful firewall built-in, and their default firewall
rules are pretty restrictive. Thus if you install any custom services
(e.g., web server, NFS, Samba), chances are their traffic will be
blocked by the firewall rules. You need to open up necessary ports on
the firewall to allow their traffic.
On CentOS/RHEL 6 or earlier, the iptables service allows
users to interact with netfilter kernel modules to configure firewall
rules in the user space. Starting with CentOS/RHEL 7, however, a new
userland interface called firewalld has been introduced to replace iptables service.
To check the current firewall rules, use this command:
$ sudo iptables -L
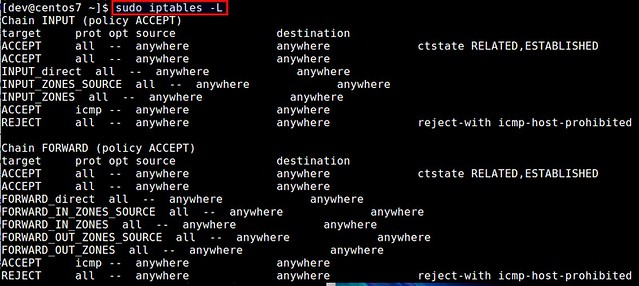
Now let's see how we can update the firewall to open a port on CentOS/RHEL.
Open a Port on CentOS/RHEL 7
Starting with CentOS and RHEL 7, firewall rule settings are managed by firewalld service daemon. A command-line client called firewall-cmd can talk to this daemon to update firewall rules permanently.To open up a new port (e.g., TCP/80) permanently, use these commands.
$ sudo firewall-cmd --zone=public --add-port=80/tcp --permanent
$ sudo firewall-cmd --reload
Without "--permanent" flag, the firewall rule would not persist across reboots.$ sudo firewall-cmd --reload
Check the updated rules with:
$ firewall-cmd --list-all
Open a Port on CentOS/RHEL 6
On CentOS/RHEL 6 or earlier, the iptables service is responsible for maintaining firewall rules.Use iptables command to open up a new TCP/UDP port in the firewall. To save the updated rule permanently, you need the second command.
$ sudo iptables -I INPUT -p tcp -m tcp --dport 80 -j ACCEPT
$ sudo service iptables save
Another way to open up a port on CentOS/RHEL 6 is to use a terminal-user interface (TUI) firewall client, named system-config-firewall-tui.$ sudo service iptables save
$ sudo system-config-firewall-tui
Choose "Customize" button in the middle and press ENTER.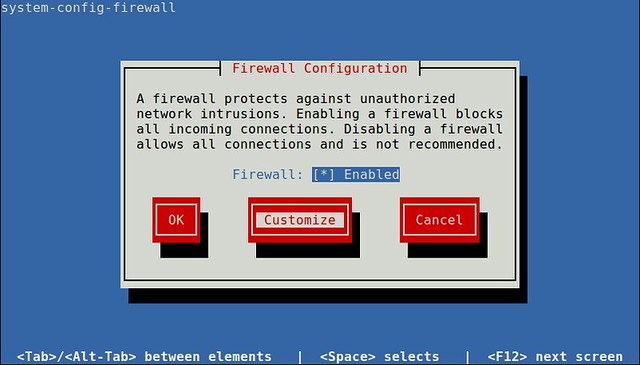
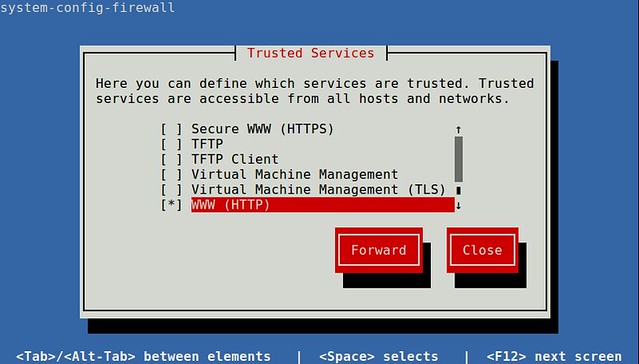
If you are trying to update the firewall for any well-known service (e.g., web server), you can easily enable the firewall for the service here, and close the tool. If you are trying to open up any arbitrary TCP/UDP port, choose "Forward" button and go to a next window.
Add a new rule by choosing "Add" button.
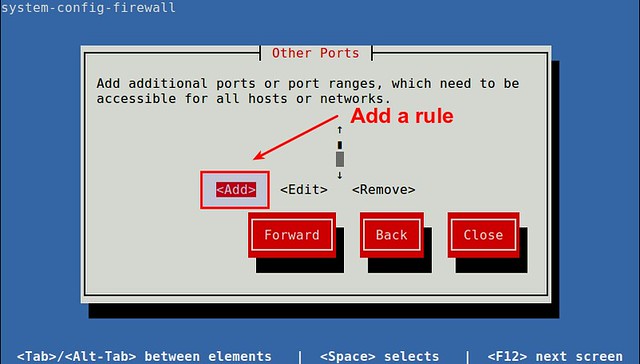
Specify a port (e.g., 80) or port range (e.g., 3000-3030), and protocol (e.g., tcp or udp).
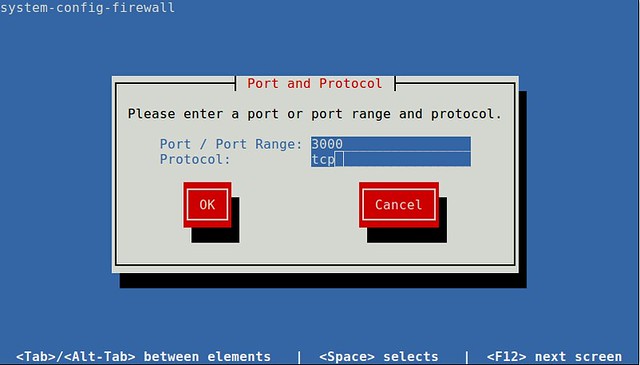
Finally, save the updated configuration, and close the tool. At this point, the firewall will be saved permanently.

Download this article as ad-free PDF (made possible by your kind donation):


